Floppyfw:
Introduction:
As a newcomer to Linux many of the "simplest" tasks left me scratching my head. I hope that the explanations of my installation of the floppyfw will be helpful to those not yet fully versed in a real operating system. I'm using the floppyfw to put my home computer behind this and a cable modem. You can just as easily put a home network behind the firewall box. Check your terms of service with your supplier to see what is allowed. Cable modems don't have much going for them in the security department and it's a good idea to separate your personal/critical data from the Internet. Some vandal/cracker will ultimately spray paint his name on your box if you don't protect it. Since floppyfw uses a minimum of hardware and software one has to categorize it as a very elegant solution to a complicated problem.
I'm describing how to put together a floppyfw from the perspective of doing it all within the Linux operating system. You can put a machine with another operating system behind your firewall and you can download and configure floppyfw with another operating system. But, if you do then you are on your own.
Distributions:
Unlike other operating systems (OS's) Linux comes in a variety of flavors called distributions. Religious type wars are waged over the relative merits of one over the other. Some of the more familiar distributions are Redhat , SuSe, Mandrake , Turbolinux , Debian , Slackware, Caldera . While they may be arranged differently and have a singular look and feel they are all based on the same kernel . As much as anything it is the kernel that makes it be Linux.
Floppyfw is a distribution just like any of the others -- it's just focused on a single use -- but with the same kernel (albeit - scaled down to its needed components).
Hardware You'll Need:
If you are a beginner then I would recommend you use a Pentium based processor for your firewall box. Any old Pentium processor will work. You can build these systems quite cheaply. The Pentium won't give you a faster connection than a 486 but it is much easier to configure. The PCI bus architecture allows you to put a pair of cheap NE-2000 clone PCI network cards (NIC's) into appropriate slots. The BIOS and kernel will usually detect these without further ado.
The 486 will require some tinkering (primarily the append line in the syslinux.cfg file) -- if you go there then you lose beginner status and I can't help you.
So, your supply list looks like this:
Either an old computer with two NIC's or build your own with:
CPU (Pentium whatever)
Motherboard
Two NIC's (make them NE-2000 clones -- saves hassle)
One floppy drive
The absolute cheapest Video card available (you aren't going to use it anyway)
16 megs of memory (you can do it with 8 megs if you have to)
A Case and Power supply
Power Cord
You'll also need the temporary use of a monitor and keyboard
A Simple Firewall:
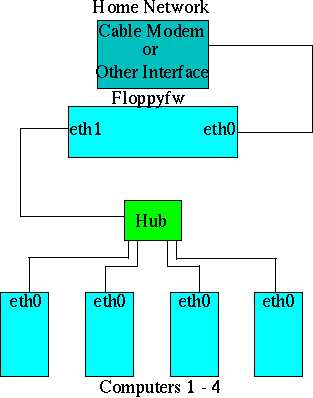
In the Linux world counting starts with zero. You'll have your floppyfw box with two NIC's in it. In this case Linux refers to the NIC as an ethernet card interface which is written "eth". A numerical designation is added: therefore the first ethernet card becomes eth0 and the second becomes eth1. Floppyfw is already configured for the eth0 interface to connect to the outside world and for the eth1 interface to connect to your home computer or network.
Here is what it might look like:
In order for your individual computers to have Internet access they must each be configured to make the floppyfw eth1 interface as their default gateway. In Linux, configuring interfaces (e.g.ethernet cards) to "have" certain numbers is a fairly basic task. If you've never accomplished it before you may find it daunting. Take the time to read about what you are trying to do. You must decide on a set of IP numbers to assign to your home network. You must select valid numbers for a private network. These are numbers that are not ever going to be seen on the Internet. You can agonize over what numbers to pick but it really doesn't matter as long as they fall within the proper range for private addresses.
192.168.1.1 is a valid address -- it doesn't matter if everyone in the world has that same number because it is private -- your network won't be communicating with the outside world. How's that? Your computer is going to be getting Internet access! That's the reason for all this trouble!
This is where your floppyfw firewall comes in: The floppyfw will take each computer's packets of data bound for the Internet and changes them to a valid Internet IP address (This is the IP address that your cable modem is assigned). On the return trip back to your computer the floppyfw will change them back to your private address. This is a combination of IP forwarding (eth1 to eth0) and of IP masquerading. Now your four computers share the same IP address seamlessly.
To save some trouble you could assign 192.168.1.1 to eth1 in the floppyfw. Assign 192.168.1.2 to your computer and then just keep adding digits on the end for each additional computer you have. All of them will need to be configured to have 192.168.1.1 as their default gateway.
Your Internet Service provider will also have a set of Domain Name Server IP numbers. You need this information to configure the floppyfw as well as any other computers on the network. These are commonly called DNS IP numbers. Your floppyfw (and other computers) have to have access to these servers in order to locate web pages. Nothing happens without them. In Linux machines these numbers go in the /etc/resolv.conf file. You'll also need your Internet Service Provider's Domain Name. If your email address is bozo@incredible.com then the domain name is incredible.com.
Take a deep breath:
You've gotten together all the pieces and parts to start with.
1. This assumes that you have a computer (with two network cards) to use as your firewall box. You have a keyboard and monitor to test your system with.
2. You have your regular day to day computer configured with an ethernet card.
3. You've got some patch cables (Cat V ethernet cables - patch not crossover) - one for every NIC. An ethernet hub (I don't recommend any particular one -- here's a picture of what you're looking for).
4. Obviously, you are on the Internet somehow already.
5. You've gotten your cable modem and account already set up (If you are using DSL - the setup is very similar- depends on whether you are using a DHCP client daemon or not.
6. You know the DNS addresses (at least two) and the Domain of your Internet Provider.
7. You have decided on your private network addresses
8. You know the Netmask and Broadcast address of your private network
(Save some agony - if you use 192.168.1.1 for floppyfw eth1 then your netmask is:
255.255.255.0 and your broadcast is 192.168.1.255)
9. You understand that the floppyfw box has an outside address that is either assigned to you via DHCP or is an actual fixed number to put in your floppyfw configuration file. Either way, the outside address comes from the Internet provider. By default this is eth0. This number will be the gateway for the floppyfw box.
10. You understand that the inside address is the number you chose from thin air (valid private Class C address). This is the number that will be the gateway for the rest of the home network.
11. You know how to configure the following on your home computer (I hope it's Linux based).
Default gateway
Domain
DNS
12. You've got a blank floppy lying around.
Download the necessary packages:
In Netscape Navigator (a fairly standard browser available for Linux) just hold the shift key and click on the floppyfw image at the beginning of the floppyfw home page. You'll be presented with a save file option for your home directory. Select yes, OK, or whatever will commence the download. Make a note of where you put the file. As soon as it is done you need to log onto your Linux machine as root. Put the blank floppy (might be a good idea to label it first) in the drive. Change directories to the location of the downloaded file.
Type: dd if=floppyfw-current.img of=/dev/fd0
Where floppyfw-current.img is the name of the image file you downloaded.
This simply takes the file which is really an image of the entire compressed distribution and places it on your floppy disk. Now you'll need to configure the distribution to work with your own network. You'll need to access your floppy drive and do a little editing. One of the most confounding and frustrating experiences for a newcomer to Linux is the concept of mounting filesystems. You can't just change directories to the A:/ drive as if you were in the DOS world. You've got to mount the drive first, then you can change your working directory to the floppy. To further confound you the file on the floppy is in a msdos format. Make sure you are logged in as root and:
Type: mount -t msdos /dev/fd0 /mnt/floppy
(This should be standard for most Linux distributions)
If that gets no error messages then:
Type: cd /mnt/floppy
Again, if no error messages then:
Type: ls
That should get you a listing of the files on the floppy:
[root@nigel floppy]# ls
config floppyfw.msg initrd.gz modules packages vmlinuz
firewall.ini floppyfw.txt ldlinux.sys modules.lst syslinux.cfg
floppyfw hosts licenses network.ini syslog.cfg
[root@nigel floppy]#
The Last Step:
You need to configure the floppyfw for your own system. The file to change is /mnt/floppy/config . You will use a text editor to make the changes. There are a number of options -- If you are comfortable with one the use it. I personally use the Midnight Commander file manager for editing simple files. I'm going to explain the process using the editor pico that comes with pine (a fairly standard application for most distributions).
To see if you have pico
Type: which pico
You should see
usr/bin/pico
or something that shows it is on your system.
Type: cd /mnt/floppy
Then type: pico config
This puts you smack into the middle of the configuration file. Unless you are mighty comfortable editing with a text editor I suggest we keep it simple. Use the arrow keys to get around, and the backspace key to delete with. The file (as do most scripts) has a number of lines preceded by the pound sign. These are comments and are not acted on. Use your arrow keys to get to the part that looks like:
# to get a new IP-address.
#
OUTSIDE_IP=
#OUTSIDE_IP=DHCP
#
# eth0 default device.
Remember, arrow keys and backspace: remove the # in front of #OUTSIDE_IP=DHCP and put a # in front of OUTSIDE_IP= This part of the file should look like this: (We are assuming you are using DHCP)
# to get a new IP-address.
#
#OUTSIDE_IP=
OUTSIDE_IP=DHCP
#
# eth0 default device
Next arrow down to the part that looks like:
#
#
# Your inside network, this has 10.42.42.* set as default,
# eth1 default device.
#
INSIDE_IP=10.42.42.*
INSIDE_DEV=eth1
INSIDE_NETMASK=255.255.255.0
INSIDE_BROADCAST=10.42.42.255
#
# Misc
#
DEFAULT_GATEWAY=eth0
NAME_SERVER_IP1=
NAME_SERVER_IP2=
DOMAIN=
HOSTNAME=floppyfw
Change the INSIDE_IP=10.42.42.*
to read INSIDE_IP=192.168.1.1
Change the INSIDE_BROADCAST=10.42.42.255
to read INSIDE_BROADCAST=192.168.1.255
Fill in the required information for:
NAME_SERVER_IP1=
NAME_SERVER_IP2=
DOMAIN=
That's it, your floppy firewall is ready to go.
Save the file:
Cntrl-X
Select Y
hit enter
That should write your changes to the floppy.
Type cd
(puts you back in the root directory)
Type umount /dev/fd0
(One must unmount what was previously mounted
-- make sure the command is umount not unmount)
Pop the floppy out and put it in the floppyfw box.
Floppyfw CMOS setting:
Most computers can be configured to boot up successfully without having a keyboard attached. The conventional place to do this is in the CMOS setup. While the computer is counting memory the CMOS setup can be accessed (usually) by pressing the delete key. Following the directions on the screen you should be able to find a line that says something like: HALT ON: ALL ERRORS highlight the ALL ERRORS variable and using the prescribed keys (usually page up or page down) change it to NO ERRORS. Hit the escape key, arrow over to the save settings and exit bar and do so.
It's a good idea to have a monitor and keyboard attached at first to make sure you boot up successfully.
You'll have eth0 connected (physically with the patch cable) to the cable modem
You'll have eth1 connected to the hub
You'll have your computer connected to the hub
Now, I can't tell you from here which one of your ether cards is eth0 and which is eth1 -- he he you've got a 50-50 chance. You can determine this by detaching the cable modem from the floppyfw box and booting up the floppyfw. Attach the cable from the hub to either of the NIC's in the floppyfw (feeling lucky?) Now, from your computer
Type: ping -c 4 192.168.1.1
You should get something like this back:
[root@nigel /root]# ping -c 4 192.168.1.1
PING 192.168.1.1 (192.168.1.1): 56 data bytes
64 bytes from 192.168.1.1: icmp_seq=0 ttl=64 time=0.8 ms
64 bytes from 192.168.1.1: icmp_seq=1 ttl=64 time=0.8 ms
64 bytes from 192.168.1.1: icmp_seq=2 ttl=64 time=0.8 ms
64 bytes from 192.168.1.1: icmp_seq=3 ttl=64 time=0.8 ms
--- 192.168.1.1 ping statistics ---
4 packets transmitted, 4 packets received, 0% packet loss
round-trip min/avg/max = 0.8/0.8/0.8 ms
[root@nigel /root]#
If you get nothing then hit Cntrl-C and switch the cables. Try the ping command again and you should get a response. If not, then you've got a bit of trouble shooting to deal with. Fear not, go back through this again and make sure it's all entered correctly.
Anyway, assuming it worked you now know that the interface that responded is eth1.
Connect the Cable modem to the other (eth0) interface and boot up again. Once the floppyfw has booted up you can type (on the floppyfw box)
ifconfig
eth0 Link encap:Ethernet HWaddr 00:40:33:57:D4:B9
inet addr:192.168.95.95 Bcast:192.168.95.255 Mask:255.255.255.0
UP BROADCAST RUNNING MULTICAST MTU:1500 Metric:1
RX packets:16346 errors:0 dropped:0 overruns:0 frame:0
TX packets:15584 errors:0 dropped:0 overruns:0 carrier:0
collisions:19 txqueuelen:100
Interrupt:9 Base address:0x6c00
eth1 Link encap:Ethernet HWaddr 00:40:33:D1:82:7F
inet addr:192.168.94.94 Bcast:192.168.94.255 Mask:255.255.255.0
UP BROADCAST RUNNING MULTICAST MTU:1500 Metric:1
RX packets:121349 errors:0 dropped:0 overruns:0 frame:766
TX packets:127187 errors:0 dropped:0 overruns:0 carrier:0
collisions:109 txqueuelen:100
Interrupt:10 Base address:0x300
lo Link encap:Local Loopback
inet addr:127.0.0.1 Mask:255.0.0.0
UP LOOPBACK RUNNING MTU:3924 Metric:1
RX packets:71 errors:0 dropped:0 overruns:0 frame:0
TX packets:71 errors:0 dropped:0 overruns:0 carrier:0
collisions:0 txqueuelen:0
The actual IP numbers will not be the same on your setup -- the important thing is that all three interfaces are up and running. If they are you should be good to go.
You can (on your regular computer not the floppyfw computer -- as root from the command line)
Type: route add default gw 192.168.1.1 dev eth0
(Assuming you configured your eth0 card on your regular computer)
This will set you up.
Now, from your regular box at the command line
Type: ping -c 4 cdrom.com
PING cdrom.com (209.155.82.18): 56 data bytes
64 bytes from 209.155.82.18: icmp_seq=0 ttl=242 time=169.6 ms
64 bytes from 209.155.82.18: icmp_seq=1 ttl=242 time=146.1 ms
64 bytes from 209.155.82.18: icmp_seq=2 ttl=242 time=153.6 ms
64 bytes from 209.155.82.18: icmp_seq=3 ttl=242 time=159.4 ms
--- cdrom.com ping statistics ---
4 packets transmitted, 4 packets received, 0% packet loss
round-trip min/avg/max = 146.1/157.1/169.6 ms
[root@nigel /root]#
If you can ping out from your regular box then you are connected!
Conclusion:
There is no reason this won't work without a hitch. The floppyfw is one of the most bombproof ways to get some firewall protection and a stable connection. Don't be discouraged if your first try isn't successful. There are tremendous help resources available via the Internet. For that matter most distributions of Linux have extensive help documents in the /usr/doc directory. You can access them with your browser: just type file:/usr/doc in the location bar. (The same place you would type http://www.whomever.com)
The Usenet groups are another resource.
comp.os.linux.networking
comp.os.linux.answers
comp.os.linux.setup
These are all good news groups to browse. Take the time to read some before you jump right in. Chances are your question was just answered.
September 25, 1999